Last Updated on 29 July 2025 by Greg Brookes
Want to bulletproof your shoulders and core with one move? The kettlebell overhead carry trains postural strength, joint stability, and total-body tension like few other exercises.
This guide walks you through how to perform the overhead carry safely and effectively, how it compares to other carry variations, and how to program it for real-world gains.
What is the Kettlebell Overhead Carry?
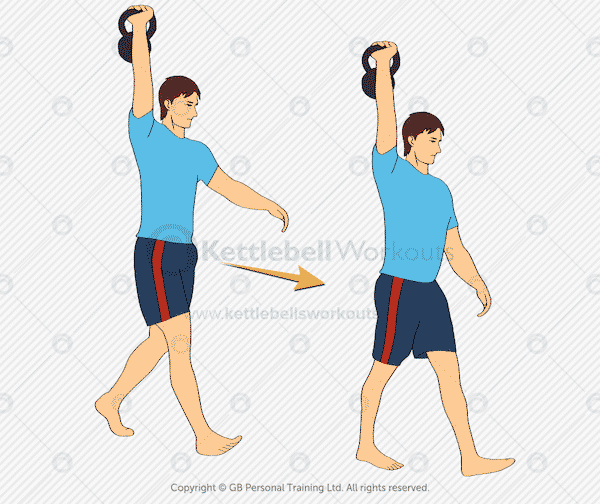
The overhead carry is a loaded walking drill where you hold one or two kettlebells locked out overhead while walking for distance or time. It demands full-body coordination, shoulder stability, and active core engagement throughout the movement.
Unlike the suitcase or farmers carry, which challenge you with load at your sides, the overhead carry shifts the load above your head. This position amplifies the demand on your core and shoulder stabilisers, making it a unique and powerful tool.
Common Variations:
- Single-arm overhead carry (standard starting point)
- Double overhead carry (advanced version)
- Waiter carry (similar but with the arm slightly in front)
Why It Matters
Overhead carries build more than strength. They enhance control. The vertical load activates the entire kinetic chain, from your feet to your fingertips.
Whether you’re rehabbing a shoulder, prepping for overhead presses, or improving postural awareness, the overhead carry develops essential qualities for long-term performance.
Key Benefits:
- Improves shoulder joint stability and mobility
- Enhances core control through anti-extension demand
- Reinforces optimal posture under load
- Builds time-under-tension endurance and mental focus
Muscles Worked
This exercise targets many of the same systems as other carries but with a vertical vector of load:
- Deltoids and rotator cuff (stabilising shoulder)
- Trapezius and serratus anterior (scapular control)
- Transverse abdominis and rectus abdominis (anti-extension core)
- Glutes and hamstrings (postural support during walking)
The entire system is activated to maintain a stable overhead position.
Step-by-Step Instructions
- Setup: Clean and press a kettlebell into a solid overhead lockout position.
- Posture Check: Biceps by ear, ribs down, glutes tight. Avoid arching the lower back.
- Walk: Begin walking with short, stable steps. Stay vertical with no lean or sway.
- Control the Descent: After completing your set, lower the kettlebell slowly and safely.
Tip: Keep your wrist neutral and eyes forward. Don’t stare at the kettlebell.
Common Mistakes to Avoid
- Overarching the lower back – Keep your ribs pulled down and glutes active.
- Shoulder elevation or shrugging – Your traps shouldn’t be doing all the work.
- Elbow softness – Lock out the elbow and keep the arm vertical.
- Looking up at the kettlebell – This disrupts your alignment and balance.
Coach’s Insight: Greg’s Take
When I train clients with hypermobility or poor shoulder awareness, the overhead carry gives me immediate feedback. You can’t cheat it. Either you’re aligned and stable, or the whole chain falls apart.
I often use single-arm carries to uncover asymmetries. Most people are surprised how much harder it is on one side. It’s a diagnostic and a solution.
Warm-Up Drills
To prepare for overhead carries:
- Shoulder CARs (Controlled Articular Rotations) – improve joint control
- Half kneeling kettlebell press – groove overhead mechanics

Progressions and Regressions
Building up to a strong and safe overhead carry means progressing gradually through levels of complexity and load. These steps ensure you master the necessary control, mobility, and strength at each stage.
1. Overhead Hold (Static)
Stand tall with a kettlebell overhead. Hold for 20–30 seconds per arm. Focus on keeping your core engaged, ribs down, and wrist stacked over your shoulder. This teaches basic stability and awareness under vertical load.
2. Waiter Carry
Hold the kettlebell with a bent elbow and the bell slightly in front of your head, like a waiter balancing a tray. It’s easier on the shoulder joint and helps you maintain posture while introducing dynamic movement.
3. Single-Arm Overhead Carry
Press the kettlebell overhead and begin walking slowly. Keep your biceps close to your ear and avoid leaning or swaying. This version teaches you to stabilise through the entire chain and reveals any left-right imbalances.
4. Double Kettlebell Overhead Carry
With a kettlebell in each hand, walk under full tension. This demands total body control and precise technique. Use only once you’ve mastered single-arm carries with perfect posture.
Optional Step: Integrate the overhead carry into complexes or flows (e.g., clean and press into carry) to challenge endurance and fluidity under load.
Programming Tips and Reps
Use overhead carries in warm-ups, finishers, or as standalone drills on recovery days.
Sample Routine:
- Single-Arm Overhead Carry x 20–30 metres per arm
- Rest 60–90 seconds
- Repeat 2–4 rounds
Great paired with suitcase or farmers carries for a full core and posture circuit.
Comparison to Similar Movement
Overhead Carry vs. Suitcase Carry:
- Overhead carry trains anti-extension and shoulder stability.
- Suitcase carry targets anti-lateral flexion and asymmetry.
Use both to round out your core strength and loaded carry training.
Related Exercises
- Kettlebell Suitcase Carry – unilateral core and posture drill
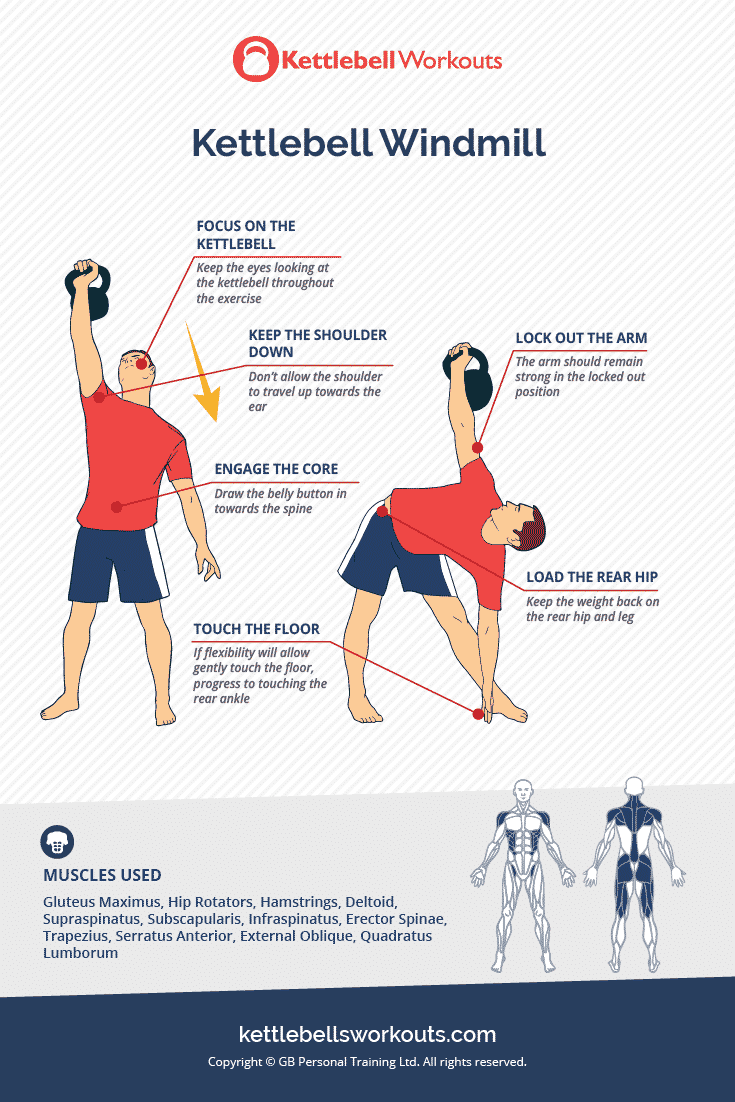
- Kettlebell Windmill – shoulder mobility and anti-rotation
- Kettlebell Bottoms-Up Press – grip and shoulder integrity
- Kettlebell Turkish Get-Up – mobility and control under load

Want More Smart Kettlebell Training?
Explore my full carry series to improve real-world strength, posture, and joint control with expert-built programming.
Build grip and core endurance further. Explore all kettlebell carries and exercises.
Frequently Asked Questions
It strengthens your shoulder stability, core control, and posture alignment.
Begin with a single-arm version to build control before trying the double overhead carry.
Use a kettlebell that allows you to stay vertical and braced for 20–30 metres.
It complements pressing well and builds joint integrity, but it doesn’t replace dynamic pressing work.
Yes, if performed correctly and progressively. Start with static holds and light loads.


Comments